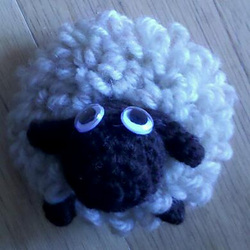
Sheep Tape Measure
Based on Sheep Earmuffs for Kids Pattern, by Joanne Loh
Difficulty Level: Advance Beginner, must know how to crochet
ls [loop stitch],
ls2tog, sc, sc2tog & ch.
Finished
size: approx. 3.5″ diameter for sheep (including the loops).
Materials & Tools:
1. Yarn : medium worsted weight, White (approx. 20g), Black
(approx. 10g). (I used 100% wool)
2. Crochet hook: Size e, or 3.5 mm
3. Tapestry Needle (to join body parts and hide yarn ends)
4. Plastic Round Tape Measure.
5. Wiggly eye buttons, 2.
6. Poly-fill or wool for stuffing
8. Sewing kit
Abbreviations:
ch = chain
sc = single crochet
ls = loop stitch
sc2tog = single crochet 2 together or single crochet decrease
ls2tog = loop stitch 2 together or loop stitch decrease
st = stitch
MM= move marker
FO= fasten off
Instructions:
Body (White)
(Loop’s length: about 1″ long)
Round 1: Ch2, 8sc in 1st chain. MM. (8)
Round 2: *2ls in each st*, repeat from * around. MM. (16)
Round 3: *2 ls in first st, 1 ls in next st*, repeat from * around. MM. (24)
Round 4: *2 ls in first st, 1 ls in next 2 sts*, repeat from * around. MM. (32)
Round 5: *2ls in first st, 1 ls in next 3 sts*, repeat from * around. MM. (40)
Rounds 6: 1 ls in each st around. Join. MM (32)
Round 7: Ch 1, turn. Sc in nx 38 sts, leave rem sts unworked. (38 sc)
Round 10: Ch 1, turn. Sc around. (38 sc)
Round 11: Ch 1, turn. Sc across. Ch 2. Join to beg st. (38 sc)
Round 12: Ch 1, turn. Working in each st and ch sp, (2tog, 1 sc in next 3 sts) around. (30 sc)
**I MADE THE HEAD AND EARS AT THIS POINT, SEWED THEM TOGETHER, SEWED ON THE EYES, AND SEWED IT TO THE COVER NOW, BUT YOU CAN DO IT LATER IF YOU WANT TO. IT'S A BIT HARDER TO DO WHEN THE COVER IS FINISHED.**
Insert tape measure, making sure that button is on top and the tape is in the hole.
Begin working in rounds again.
Round 10: (Dec, sc in next 2 sts) around. (24 sc)
Round 11: (Dec, sc in next st) around. (16 sc)
Round 12: Dec around. Join. (8 sc)
FO, leaving a long end. You can either leave the hole open (1) to show the button,
or sew it shut by weaving the end in and out of remaining sts, pull tight to close
and tie off.
Head (Black)
Round 1: Ch2, 6sc in 1st chain. MM. (6)
Round 2: *2sc in each st*, repeat from * around. MM. (12)
Round 3: *2sc in first st, 1sc in next st*, repeat from * around. MM. (18)
Round 4: *2sc in first st, 1sc in next 2 sts*, repeat from * around. MM. (24)
Round 5 – 6: 1 sc in each st around. MM (24)
Round 7: *sc2tog, 1sc in next 2 sts*, repeat from * around. MM. (18)
Round 8 – 10: 1 sc in each st around. MM (18)
Round 11: *sc2tog, 1sc in next st*, repeat from * around. MM. (12)
Round 12: 1 sc in each st around. MM (12)
Stuff
Round 13: sc2tog in each st around. MM. (6)
FO with at least 6″ yarn tail
Ear (Black) – Make 2
Round 1: Ch2, 6sc in 1st chain. MM. (6)
Round 2 – 3: 1 sc in each st around. MM (6)
Round 4: sc2tog in each st around. MM. (3)
Round 5: 1 sc in each st around. MM (3)
FO with at least
6″ yarn tail
Leg (Black) – Make 2
Round 1: Ch2, 6sc in 1st chain. MM. (6)
Round 2: sc2tog in each st around. MM. (3)
Round 3 – 4: 1 sc in each st around. MM (3)
FO with at least 6″ yarn tail
Assemble:
With tapestry needle, sew ears at round 10 of the head, 10 stitches apart.
Sew head to the body with top of the head at the center of the body.
Sew legs at round 6 of the body, 5 stitches apart.
Sew on eyes at round 8 of the head.
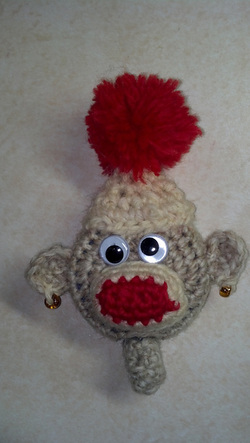
Sock Monkey Tape Measure
Difficulty Level: Advance Beginner, must know how to crochet and make a pompom.
sc, sc2tog & ch.
Finished size:approx. 2″ diameter.
Materials&
Tools:
1. Yarn : medium worsted weight, Tweed (approx. 20g), White (approx. 5g), Red (approx. 10g), Black (1 foot). (I used 100% wool)
2. Crochet hook: Size e, or 3.5 mm
3. Tapestry Needle (to join body parts and hide yarn ends)
4. Plastic Round Tape Measure.
5. Wiggly eye buttons, 2.
6. E-beads, gold, 2.
7. Poly-fill or wool for stuffing
8. Sewing kit
Abbreviations:
ch = chain
sc = single crochet
sc2tog = single crochet 2 together or single crochet decrease
st = stitch
MM= move marker
FO= fasten off
Instructions:
Body (Tweed)
Round 1: Ch2, 8sc in 1st chain. MM. (8)
Round 2: *2sc in each st*, repeat from * around. MM. (16)
Round 3: *2sc in first st, 1 sc in next st*, repeat from * around. MM. (24)
Round 4: *2sc in first st, 1 sc in next 2 sts*, repeat from * around. MM. (32)
Round 5: *2sc in first st, 1 sc in next 3 sts*, repeat from * around. MM (40)
Round 6 – 8: 1 sc in each st around. Join. MM (40)
Round 9: Ch 1. Sc in next 38 sts, leave rem sts unworked. (38 sc)
Round 10: Ch 1, turn. Sc around. (38 sc)
Round 11: Ch 1, turn. Sc across. Ch 2. Join to beg st. (38 sc)
Round 12: Ch 1. Working in each st and ch sp, (sc2tog, 1 sc in next 3 sts) around. (32 sc)
**I MADE THE MOUTH AND EARS AT THIS POINT AND SEWED THEM AND THE
EYES ONTO THE COVER NOW, BUT YOU CAN DO IT LATER IF YOU WANT TO. IT'S A BIT
HARDER TO DO WHEN THE COVER IS FINISHED.**
Insert tape measure, making sure that button is on top and the tape is in the hole.
Begin working in rounds again.
Round 10: (Dec, sc in next 2 sts) around. (24 sc)
Round 11: (Dec, sc in next st) around. (16 sc)
Round 12: Dec around. Join. (8 sc)
FO, leaving a long end. You can either leave the hole open (1) to show the button,
or sew it shut by weaving the end in and out of remaining sts, pull tight to close
and tie off.
Mouth(White and Red)
With red:
Round 1: Ch6, sc in 2nd chain from hook, sc around placing 2sc in end, join. MM. (8)
Round 2: Ch1, 2sc in first st, sc in each stitch to end, 2sc in end, cont. sc around, join to beg stitch. MM. (10)
Round 3: Rep rnd 2. MM. (12)
Switch to white:
Round 4-6: Rep rnd 2. MM. (18)
Stuff.
FO with at least 6″ yarn tail and stitch to front of cover, placing one row up from edge. Using black yarn or embroidery thread, stitch
nostrils onto white portion of mouth.
Ear (Tweed) – Make 2
Round 1: Ch2, 6sc in 2nd ch from hook. DO NOT join. Turn. MM. (6)
Round 2: Ch1, 2sc in first st, 1sc to last st, 2sc in last st. MM (8)
Round 3: Turn, ch1, sc in each st. MM. (8)
FO with at least 6″ yarn tail. Repeat.
Sew gold beads onto lobes.
Hat (White and Red)
With white:
Round 1: Ch16, join into circle. (MM)
Round 2: Ch1, sc around. DO NOT join, begin working spiral. MM. (16)
Round 3: Work 1 dec, 1sc around until 4sc remaining. MM (4)
FO with at least 6″ yarn tail working needle through front lp of ea sc and pulling tight, weaving in ends.
With red:
Make 1” to 1.25” pompom using pompom maker or by winding yarn around 2” stiff, flat object. (I used the end of my knitting
gauge.) Trim into round ball and attach to top of hat.
Tail (Tweed)
Tape end cover.
Round 1: Ch 2, 6sc in 2ndch from hook. Do not join. MM. (6)
Round 2: 2sc in each sc around. MM. (12)
Round 3: 1sc in each sc around, join. MM. (12)
Round 4: Ch1, dec1, sc around, stopping short 2 of marker. MM (9)
Round 5: Turn, ch1, sc around, ch2, join. MM. (9)
Place tape end in ch space. Place glue btw tape and tail, if desired.
Round 6: Dec around, incl ch space. MM. (5)
FO with at least 6” yarn tail working needle through front lp of ea sc and pulling tight, weaving in ends.
Assemble:
With tapestry needle, sew ears to side of head.
Sew hat to head. (Stuff if desired; I didn't stuff it.)
Enjoy!
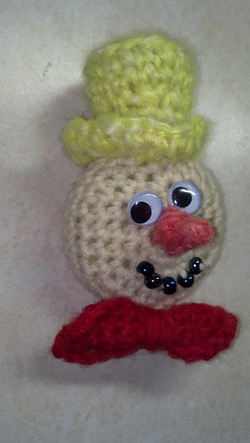
Cheery Snowman Tape Measure Cover
Difficulty Level: Advance Beginner. sc, sc2tog & ch.
Finished size: approx. 2″ diameter.
Materials & Tools:
1. Yarn : medium worsted weight, White (approx. 20g), Yellow (approx. 10g), Red
(approx. 10g), Orange (5g). (I used 100% wool)
2. Crochet hook: Size E, or 3.5 mm
3. Tapestry Needle (to join body parts and hide yarn ends)
4. Plastic Round Tape Measure.
5. Wiggly eye buttons, 2.
6. E-beads, dark, 5.
7. Poly-fill or wool for stuffing
8. Sewing kit
Abbreviations:
ch = chain
sc = single crochet
sc2tog = single crochet 2 together or single
crochet decrease
st = stitch
MM= move marker
FO= fasten off
Instructions:
Head (White)
Round 1: Ch2, 8sc in 1st chain. MM. (8)
Round 2: *2sc in each st*, repeat from * around. MM. (16)
Round 3: *2sc in first st, 1 sc in next st*, repeat from * around. MM. (24)
Round 4: *2sc in first st, 1 sc in next 2 sts*, repeat from * around. MM. (32)
Round 5: *2sc in first st, 1 sc in next 3 sts*, repeat from * around. MM (40)
Round 6 – 8: 1 sc in each st around. Join. MM (40)
Round 9: Ch 1. Sc in next 38 sts, leave rem sts unworked. (38 sc)
Round 10: Ch 1, turn. Sc around. (38 sc)
Round 11: Ch 1, turn. Sc across. Ch 2. Join to beg st. (38 sc)
Round 12: Ch 1. Working in each st and ch sp, (sc2tog, 1 sc in next 3 sts) around. (32 sc)
**I MADE THE MOUTH AND NOSE AT THIS POINT AND SEWED THEM AND THE EYES ONTO THE COVER NOW, BUT YOU CAN DO IT LATER IF YOU WANT TO. IT'S A BIT HARDER TO DO WHEN THE COVER IS FINISHED.**
Insert tape measure, making sure that button is on top and the tape is in the hole.
Begin working in rounds again.
Round 10: (Dec, sc in next 2 sts) around. (24 sc)
Round 11: (Dec, sc in next st) around. (16 sc)
Round 12: Dec around. Join. (8 sc)
FO, leaving a long end. You can either leave the hole open (1) to show the button,
or sew it shut by weaving the end in and out of remaining sts, pull tight to close and tie off.
Mouth
Sew 5 E-beads in smile shape onto cover.
Nose (orange):
Round 1: Ch8, jn to form circle. MM.
Round 2: Sc in each ch around. Do not join. (8)
Round 3: Work 1dec, 1sc around in spiral until 1 st remains.
FO, weave in end.
Hat
(Yellow)
Work in spiral.
Round 1: Ch2, 6sc in 1st chain. MM. (6)
Round 2: *2sc in each st*, repeat from * around. MM. (12)
Round 3: *2sc in first st, 1 sc in next st*, repeat from * around. MM. (18)
Round 4-5: 1 sc in each st around. MM (18)
Round 6: (Dec, sc in next 3 sts) around. MM. (14)
Round 7: 1 sc in each st around. MM (14)
Round 8: *2sc in first st, 3 sc in next st*, repeat from * around. MM. (18)
Round 9-10: 1 sc in each st around. MM. (18)
FO weaving in ends. Roll brim up as desired.
Bow (Red)
Tape end cover.
Row 1: Ch 14.
Row 2-5: Turn, ch1, sc in ea st across (14)
FO weaving in ends.
With 18” red yarn, begin wrapping yarn around middle of bow several times. Thread needle with end of yarn and weave end
through back to fasten. Do not cut. Wind yarn end around tape end several times, securing end with yarn. FO, weaving end into bow.
Assemble:
With tapestry needle, sew bottom of hat onto head, making sure that brim is rolled up.
The bottom of the hat is approx the third row from the edge. (I stuffed the hat to keep its shape better.)
Enjoy!
